Left Banner

  • LeftBanner 1

Ritmo I (78-81)

Fiat Ritmo 1 | Tuning Accessories and LED Lights | QSPCARS

Active Filters

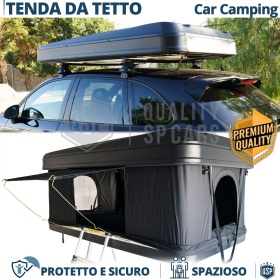
Rigid Car Roof Tent Installable on Fiat Ritmo Professional | 3...
COMPATIBILITY:

- It Can be Installed on Fiat Ritmo, with Roof Bars (already installed), with a Minimum Load Capacity of 90kg


- IF ROOF BARS HAVE A CAPACITY OF 90KG, CAN THEY SUPPORT THE TENT, WHICH WEIGHS 90KG + THE WEIGHT OF THE PEOPLE WHO WILL HOST IT?

The maximum weight capacity supplied when purchasing a pair of roof bars always represents the dynamic capacity of the bars, i.e. the maximum capacity of the same when the vehicle is moving, but all the bars, in addition to having a dynamic capacity, have a static capacity, which in most cases it is not reported on the bars.

The Static Capacity Represents the Maximum Weight Capacity of the Roof Bars with the Vehicle Stationary, and on average the latter Reaches Approximately X3 Times the Dynamic Capacity.


- CAN ALL CARS HOLD A ROOF TENT?

Absolutely Yes. The side members of each car are designed to support more than the weight of the car itself, since, in the event of an accident and the car overturning, for safety reasons, it must support its own weight.

Since the smallest of the cars weighs at least 1 Ton, by logic, it is obvious that any car (even the smallest!) can hold both the roof tent and its guests inside, without any problem.


ASSEMBLY:

- Place the tent on the roof bars of your vehicle (2 people min.)
- Under the tent there are 2 channels, insert 4 steel inserts crossed by the bolt for each channel
- Scrolling through the inserts equipped with bolts, match 2 bolts, one with the outside and one with the inside of the roof rack
- Mount the bracket supplied by gripping the part underneath the roof rack and tighten the bolts
- Remember to Tighten the Bolts Whenever You Travel.


OPENING:

- Press on the Steel Jack Closure Buckles that block the Closure Laces
- Accompany the automated opening upwards
- USEFUL ADVICE: We recommend leaving the door and window zips open for quick and easy opening and closing of the tent
- The closure occurs through long laces designed for draft from the ground


Although simple and intuitive FOR OPTIMAL ASSEMBLY, WE ALWAYS RECOMMEND THE INSTALLATION OF OUR ITEMS BY AN EXPERT
As we will not assume responsibility if the item is assembled and subsequently removed.
We trust in your common sense.
€2,002.00 Regular Price €2,600.00
Red TIRE CRADLES Flat Stop Protector, for Fiat Ritmo |...
COMPATIBILITY:

- For Fiat Ritmo (78-88)


APPLICATION: SEE THE VIDEO TUTORIAL By scanning QR CODE in Listing Images

- Place Easyrise in front of each wheel.
- Press on the gelpads to make them adhere correctly to the ground (if they do not adhere correctly, clean the gelpads with a degreaser and water).
- Perform a brief reverse motion to facilitate climbing onto the cushion.
- Climb onto the cushion with inertia without accelerating on the ramp.


We do not assume responsibility for: incorrect purchases - violations of regulations or laws of each state - damage that could be caused to you, to third parties, to the Vehicle or to the item itself, as we describe every single specification in detail.

We trust in your common sense.
€252.86 Regular Price €269.00
Black TIRE CRADLES Flat Stop Protector, for Fiat Ritmo |...
COMPATIBILITY:

- For Fiat Ritmo (78-88)


APPLICATION: SEE THE VIDEO TUTORIAL By scanning QR CODE in Listing Images

- Place Easyrise in front of each wheel.
- Press on the gelpads to make them adhere correctly to the ground (if they do not adhere correctly, clean the gelpads with a degreaser and water).
- Perform a brief reverse motion to facilitate climbing onto the cushion.
- Climb onto the cushion with inertia without accelerating on the ramp.


We do not assume responsibility for: incorrect purchases - violations of regulations or laws of each state - damage that could be caused to you, to third parties, to the Vehicle or to the item itself, as we describe every single specification in detail.

We trust in your common sense.
€224.66 Regular Price €239.00
3M REAR Windows Tinting Film for Fiat Ritmo Approved |...
COMPATIBILITY:

ATTENTION: in Italy application is only permitted on rear windows and rear windshields. We invite you to check the individual regulations of each state.

- For Fiat Ritmo (All Versions and Years)
- Pre-cut, non-shaped pieces, 10% Larger in size, capable of covering all rear windows


APPLICATION:

- In addition to the film for the application you will need: Spatula, Cutter, Water and Fabric Softener, Nebulizer, Hairdryer or Heat Gun.
- The film must always be applied internally to the glass, however the external part is also necessary, which is fundamental for shaping and modeling the film before the final application on the internal part.

- Cut the film with a good margin compared to the size of the glass to be darkened (3-5cm).
- Thoroughly clean the glass internally and externally 2-3 times.
- Spray the mixture of water and softener mixed in a ratio of 1:10 on the outside of the glass.
- Apply the Film Externally to the Glass, Keeping the adhesive part of the Film facing towards you.
- Imprint the Film on the External Glass with the Spatula Forming a Large H.
- Shape the Film Using a Hairdryer and Spatula. The objective is to remove all the bubbles by making the Film adhere perfectly to the External Glass.
(the better it is processed now the easier it will be to move and apply the film internally later)
- Once the film is completely adhered without bubbles, shape it with the cutter by cutting off the excess, remaining within the margin of 2-3mm from the edge of the glass.
- Still leaving the film on the outside of the glass, make sure again that the inside of the glass is clean and proceed to spray the solution of water and softener inside the glass.
- Remove the protective film on the adhesive area of the film. Help yourself to remove it by spraying more water and fabric softener.
- Move the film to the inside of the glass, this time with the adhesive part facing the glass itself.
- Shape and flatten the film with the spatula, removing bubbles and liquid. (if the hairdryer has been used previously it will not be needed now)

- The glasses are operational after 24 hours
- Final adhesion is achieved after approximately 15 - 20 days at 18° C and in dry climate conditions.


MAINTENANCE AND CLEANING
Use high-quality cleaners specifically for glass surfaces. The cleaning system (cloth, sponge, etc.) must be wet and not abrasive with a pH value between 6 and 8 (neither too acidic nor too alkaline).


Although simple and intuitive FOR OPTIMAL ASSEMBLY, WE ALWAYS RECOMMEND THE INSTALLATION OF OUR ITEMS BY AN EXPERT
As we will not assume responsibility if the item is assembled and subsequently removed.
We trust in your common sense.
€89.20 Regular Price €104.94