Filter By

Category

Category

Function

Function

Item

Item

Type

Type

Use on

Use on

Color

Color

Price

Price

  • €6.00 - €2,600.00

Left Banner

  • LeftBanner 1

Active Filters

There Are 94 Products.

Filter By

Category

Category

Function

Function

Item

Item

Type

Type

Use on

Use on

Color

Color

Price

Price

  • €6.00 - €2,600.00

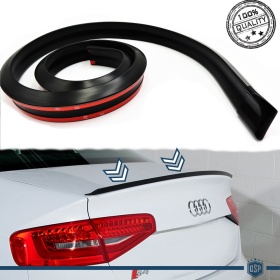
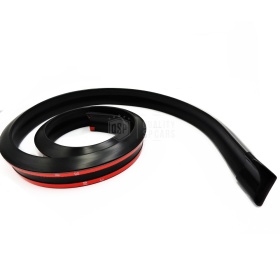
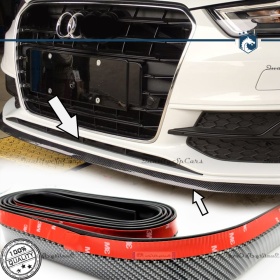
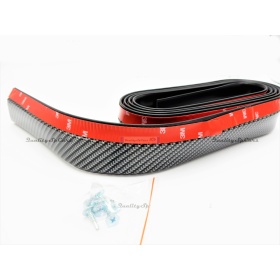
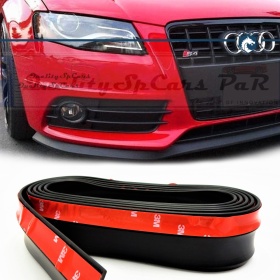
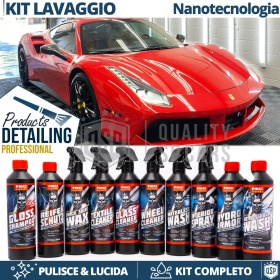
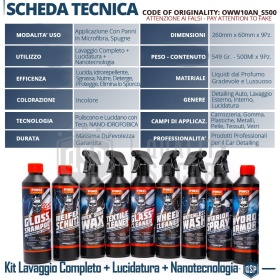
Car WASH COMPLETE Kit Professional Car Detailing for your Audi...
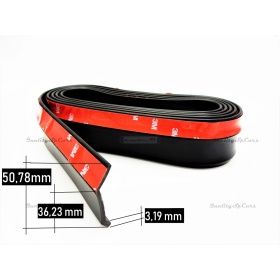
COMPATIBILITY:

- On bodywork, rubber, plastics, metals, leather, fabrics, glass of your Audi
- All Products Can Be Used on Previously Treated or Waxed Bodywork without worrying about damaging any layers


RECOMMENDED TOTALITARY APPLICATION:

1 APPROXIMATE BODYWORK WASH WITH: Gloss Shampoo (GLOSS SHAMPOO)
- Dilute 20Ml of Shampoo for 10Lt of Water
- Apply Evenly and Wash with a High Quality Sponge or Brush removing Dirt and Residue
- Rinse with Clean Water
- Dry by buffing with a clean microfiber cloth or quality chamois leather

2 BODYWORK WASH FINISHING WITH: Waterless Car Wash (WATERLESS CAR WASH)
- Spray evenly on the surface to be treated
- Rub with a microfibre cloth to remove dirt and residues
- After 30-60 Seconds, Buff The Area With A Clean Microfiber Cloth

3 WHEEL WASHING WITH: Rim Cleaner (WHEEL CLEANER - FELGENREINIGER)
- Spray evenly on the surface to be treated
- Leave to act without removing it
- Remove Dirt gently with a Sponge or Rim Brush
- Rinse after about 2 minutes

4 BODYWORK POLISHING WITH: Hydro Wax (QUICK SHINE WAX)
- Then at the end of the car wash, spray evenly on the surface to be treated
- Wait 60 Seconds
- Polish the area with a clean microfiber cloth

5 NANOTECHNOLOGY WITH: Nanotechnological Hydro Wax (HYDRO ARMOR)
- With a dry and thoroughly washed vehicle
- Dilute 50ml of Nanotechnological Hydro Wax in 450ml of water
- Apply the product with a professional sponge
- Rinse with Clean Water
- Polish with a clean microfiber cloth

6 CLEAN THE GLASSES AND MIRRORS WITH: Antistatic Glass Cleaner (GLASS CLEANER SPRAY)
- Spray a small amount on the glass to be treated
- Rub with a Microfiber Cloth Removing Dirt and Residues
- Polish the area with a second clean microfiber cloth

7 PLASTIC CLEANING OR LEATHER TREATMENT WITH: Leather, Plastic and Vinyl Interior Treatment (INTERIOR SPRAY)
- Spray evenly on the surface to be treated
- Rub with a microfibre cloth to remove dirt and residues
- Polish The Area With A Clean Microfiber Cloth

8 CLEANING CARPET OR CLOTH SEATS WITH: Fabrics and Matts Cleaner Spray (CARPET AND TEXTILE CLEANER)
- Spray evenly on the surface to be treated
- Wait a few seconds
- Absorb the liquid with a clean microfiber cloth
- To remove stains, leave it to act for a few minutes
- Absorb the liquid with a microfiber cloth
- Repeat several times until the Stain disappears

9 TIRE SHINE WITH: Black Tire Shine Protective Concentrate (REIFENSHUTZ - TIRE PROTECT)
- Checking that you have thoroughly cleaned the tires before application
- Dilute 50Ml of Concentrate in 200Ml of Water in a Plastic Bucket
- Apply the product with a sponge, cloth or brush
- Wait for Drying


Even if simple and intuitive FOR OPTIMAL USE, WE ALWAYS RECOMMEND THE APPLICATION OF OUR PRODUCTS BY AN EXPERT, Always Checking The Risk Label relating to Dangerous Substances, as any form of Contact could be dangerous. We trust in your common sense.

We do not assume responsibility for: erroneous purchases - violations of regulations or laws of any state - damages that you could cause to yourself, to third parties, to the Vehicle or to the article itself, as we describe every single specification in detail.
€122.34 Regular Price €128.78
Fog Light Grill Trim for AUDI A4 RS4 (B8) 07-11 | Honeycomb,...
COMPATIBILITY:

- For AUDI A4 (B8) 07>11, WITH FOG LIGHT HOLE
**ATTENTION: NOT compatible with S-Line Version**


INSTRUCTIONS:

- Just Replace the current one as a perfect replacement: 100% TESTED COMPATIBILITY


FOR OPTIMAL MOUNTING, EVEN IF SIMPLE REPLACEMENT, WE ALWAYS RECOMMEND THE INSTALLATION OF AN EXPERT, as we do not assume responsibility for articles mounted and subsequently detached. We trust in your common sense.

€113.08 Regular Price €117.79
3M REAR Windows Tinting Film for Audi A4 Approved | OBSIDIAN...
COMPATIBILITY:

ATTENTION: in Italy application is only permitted on rear windows and rear windshields. We invite you to check the individual regulations of each state.

- For Audi A4 (All Versions and Years)
- Pre-cut, non-shaped pieces, 10% Larger in size, capable of covering all rear windows


APPLICATION:

- In addition to the film for the application you will need: Spatula, Cutter, Water and Fabric Softener, Nebulizer, Hairdryer or Heat Gun.
- The film must always be applied internally to the glass, however the external part is also necessary, which is fundamental for shaping and modeling the film before the final application on the internal part.

- Cut the film with a good margin compared to the size of the glass to be darkened (3-5cm).
- Thoroughly clean the glass internally and externally 2-3 times.
- Spray the mixture of water and softener mixed in a ratio of 1:10 on the outside of the glass.
- Apply the Film Externally to the Glass, Keeping the adhesive part of the Film facing towards you.
- Imprint the Film on the External Glass with the Spatula Forming a Large H.
- Shape the Film Using a Hairdryer and Spatula. The objective is to remove all the bubbles by making the Film adhere perfectly to the External Glass.
(the better it is processed now the easier it will be to move and apply the film internally later)
- Once the film is completely adhered without bubbles, shape it with the cutter by cutting off the excess, remaining within the margin of 2-3mm from the edge of the glass.
- Still leaving the film on the outside of the glass, make sure again that the inside of the glass is clean and proceed to spray the solution of water and softener inside the glass.
- Remove the protective film on the adhesive area of the film. Help yourself to remove it by spraying more water and fabric softener.
- Move the film to the inside of the glass, this time with the adhesive part facing the glass itself.
- Shape and flatten the film with the spatula, removing bubbles and liquid. (if the hairdryer has been used previously it will not be needed now)

- The glasses are operational after 24 hours
- Final adhesion is achieved after approximately 15 - 20 days at 18° C and in dry climate conditions.


MAINTENANCE AND CLEANING
Use high-quality cleaners specifically for glass surfaces. The cleaning system (cloth, sponge, etc.) must be wet and not abrasive with a pH value between 6 and 8 (neither too acidic nor too alkaline).


Although simple and intuitive FOR OPTIMAL ASSEMBLY, WE ALWAYS RECOMMEND THE INSTALLATION OF OUR ITEMS BY AN EXPERT
As we will not assume responsibility if the item is assembled and subsequently removed.
We trust in your common sense.
€89.20 Regular Price €104.94
Snow Socks for Audi A4 B8, EN-APPROVED for Italy and Europe |...
COMPATIBILITY:

- Audi A4 B8 (07-11), with Tires:

205/60 R16
225/55 R16
225/50 R17
245/45 R17
225/45 R18
245/40 R18
255/35 R19

INSTALLATION:

- 1 Take a sock and insert it into the upper part of the tire, making sure that it adheres well to the rear area of the tire.
- 2 Drive a little forward with the car, to repeat the operation and fix the sock also in the part of the rubber that previously touched the road surface.
- 3 drive for a hundred meters at low speeds, stopping the car again to check that the device has been installed correctly.
- 4 continue the journey in safety taking into account the Maximum Speed of 50Km-h.


We do not take responsibility for: erroneous purchases - violations of regulations or laws of any state - damage, which you could cause to you, to third parties or to the item itself, as we detail every single specification, we trust in your common sense.
€61.73 Regular Price €64.98
H7 LED Kit for Audi A4 B8 Low Beam CANbus Bulbs | 6500K Cool...
COMPATIBILITY:

- For Lowbeam AUDI A4 B8 (2007-2011)

Ok For all versions: Avant; Allroad


FOR AN OPTIMUM MOUNTING, WE RECOMMEND:

- DISMOUNTING YOUR HALOGEN BULBS

- CHECK FIRST: Connect only the led socket (PLUG AND PLAY ); if there is not any problem, proceed with mounting operations.

- BLOCK ONLY THE LED RING: Remove the led ring from the led bulb using circular motion and fix in the locking clip of the halogen bulb.

- IMPORTANT: THE LIFE OF THE LED DEPENDS ON THE HEATSINK: Open the copper heatsink as much as possible, till you obtain a "rose shape" heatsink. Extend each heatsink, don' t be afraid to use force.

- CONNECT THE SOCKET AND LOCK THE BULB: Put the bulb inside its ring that you had previously fixed, and lock it using circular motion.


NON-STANDARD CASES


- DEEPER DUST CAPS:

Being a TRANSFORMATION kit, and not replacement bulbs, it has bigger dimensions.
If the installation of the kit does not allow to close the headlight anymore, visit our store for DEEPER DUST CAPS.

- ADAPTERS:

All cars that do not have the STANDARD LOCKING CLIP to lock the halogen bulb, may need simple ADAPTERS; found them in OUR STORE.
IMPORTANT: Their compatibility could not always depend on the model of your car; it depends mainly on the LOCKING SYSTEM of the halogen bulbs of your headlight.
€61.88 Regular Price €64.46
Rear Adhesive LED SPOILER For Audi A4 | Roof SEQUENTIAL LED...
COMPATIBILITY:

- Specific for Audi A4


ASSEMBLY:

- Wash and thoroughly clean the surface where the spoiler is to be applied

- Remove the 3M adhesive film, and adhere the spoiler to the desired part

- Connect the 3 Wires, Respectively:

BLACK: Connect to Neutral Ground
RED: Connect to the Base Lighting System
WHITE: Connect to the STOP light switch-on function

(For a perfect fixing, use a bodywork thermal hair dryer)

It is possible to cut and then shorten the spoiler from the side where the wire is not present, but this modification will inevitably involve the decentralization of the Dynamic LED function.


FOR OPTIMAL MOUNTING, EVEN IF SIMPLE REPLACEMENT, WE ALWAYS RECOMMEND THE INSTALLATION OF AN EXPERT, as we do not assume responsibility for articles mounted and subsequently detached. We trust in your common sense.

€53.17 Regular Price €55.97
Car PEDAL Covers for Audi A4 B8 AUTOMATIC Transmission |...
COMPATIBILITY:

- For Audi A4 (B8) 2007-2015, with Automatic Gearbox
- For Audi S4 (B8) 2007-2015, with Automatic Gearbox


INSTALLATION:

1) Remove the existing rubbers or plastics from the pedals
2) Snap on the new pedal covers


Even if simple and intuitive FOR AN OPTIMUM ASSEMBLY, WE ALWAYS RECOMMEND INSTALLATION OF OUR ITEMS BY AN EXPERT
As we will not take responsibility for the assembled and subsequently detached article.
We trust in your common sense.
€52.23 Regular Price €54.98
Rear Adhesive LED SPOILER For Audi A4 | Roof LED Strip in Translucent Black
  • -5%
  • New
  • Out of Stock
Rear Adhesive LED SPOILER For Audi A4 | Roof LED Strip in...
COMPATIBILITY:

- Specific for Audi A4


ASSEMBLY:

- Wash and thoroughly clean the surface where the spoiler is to be applied

- Remove the 3M adhesive film, and adhere the spoiler to the desired part

- Connect the 3 Wires, Respectively:

BLACK: Connect to Neutral Ground
RED: Connect to the Base Lighting System
WHITE: Connect to the STOP light switch-on function

(For a perfect fixing, use a bodywork thermal hair dryer)

For a perfect fit, it is possible to cut and then shorten the spoiler from the side where there is no clable; but, ATTENTION, once the modification has taken place, the Warranty and Right of Return will expire.


FOR OPTIMAL MOUNTING, EVEN IF SIMPLE REPLACEMENT, WE ALWAYS RECOMMEND THE INSTALLATION OF AN EXPERT, as we do not assume responsibility for articles mounted and subsequently detached. We trust in your common sense.

€47.47 Regular Price €49.97
2 pcs EXHAUST TIPS for AUDI A4 B8 Left + Right BLACK Stainless STEEL | PLUG & PLAY
  • -3%
  • New
  • Out of Stock
2 pcs EXHAUST TIPS for AUDI A4 B8 Left + Right BLACK Stainless...
COMPATIBILITY:

- For AUDI A4 B8 (2007-2011), With one Exhaust on the Left and one on the Right

- "NO" For Versions That Have Standard Chrome Exhausts


ASSEMBLY:

1) Measure the Bumper Opening to Make sure the New Exhaust Tips comes out
2) Slide the New Terminals onto the Existing Exhaust Tips, up to the joint point
(If desired, thanks to SS304 steel, it is possible to give a Welding Point)


Although mouting is simple and intuitive, FOR AN OPTIMAL MOUNTING, WE ALWAYS RECOMMEND THE INSTALLATION OF OUR ITEMS BY AN EXPERT.
As we will not take responsibility for the assembled and subsequently detached article.
We trust in your common sense.
€45.81 Regular Price €47.23
2 pcs EXHAUST TIPS for AUDI A4 B8 BLACK Stainless STEEL | PLUG & PLAY Installation
  • -3%
  • New
  • Out of Stock
2 pcs EXHAUST TIPS for AUDI A4 B8 BLACK Stainless STEEL | PLUG...
COMPATIBILITY:

- For AUDI A4 B8 (2007-2011), With Left Double Exhaust

- "NO" For Versions That alreday Have Standard Exhausts


ASSEMBLY:

1) Measure the Bumper Opening to Make sure the New Exhaust Tips comes out
2) Slide the New Terminals onto the Existing Exhaust Tips, up to the joint point
(If desired, thanks to SS304 steel, it is possible to give a Welding Point)


Although mouting is simple and intuitive, FOR AN OPTIMAL MOUNTING, WE ALWAYS RECOMMEND THE INSTALLATION OF OUR ITEMS BY AN EXPERT.
As we will not take responsibility for the assembled and subsequently detached article.
We trust in your common sense.
€45.80 Regular Price €47.22
Car PEDAL Covers for Audi A4 B8 Manual Transmission | Aluminum...
COMPATIBILITY:

- For Audi A4 B8 (2007-2015), with Manual Gearbox
- For Audi S4 B8 (2007-2015), with Manual Gearbox
- For Audi RS4 B8 (2007-2015), with Manual Gearbox


INSTALLATION:

1) Remove the existing rubbers or plastics from the pedals
2) Snap on the new pedal covers
3) To assemble the foot rest proceed as follows:

- Remove the Engine Compartment Opening Handle
- Remove the hook that holds the Engine Compartment Opening Handle securely
- Unhook and Remove the Engine Compartment Opening Handle by pulling it outwards
- Remove the Round Rubber Hole Cover
- Remove the Clip Screw with a Fixed Screwdriver, Rotating it Anticlockwise to Unhook and Extract it
- Now it is possible to unhook the plastic side part by extracting the existing foot rest
- Mount the new Foot Rest by fitting the clip in the upper part and close everything by repeating the operations already carried out in reverse


Even if simple and intuitive FOR AN OPTIMUM ASSEMBLY, WE ALWAYS RECOMMEND INSTALLATION OF OUR ITEMS BY AN EXPERT
As we will not take responsibility for the assembled and subsequently detached article.
We trust in your common sense.
€43.68 Regular Price €45.98
2 pcs EXHAUST TIPS for AUDI A4 B8 Left + Right Chromed Stainless STEEL | PLUG & PLAY
  • -3%
  • New
  • Out of Stock
2 pcs EXHAUST TIPS for AUDI A4 B8 Left + Right Chromed...
COMPATIBILITY:

- For AUDI A4 B8 (2007-2011), With one Exhaust on the Left and one on the Right

- "NO" For Versions That Have Standard Chrome Exhausts


ASSEMBLY:

1) Measure the Bumper Opening to Make sure the New Exhaust Tips comes out
2) Slide the New Terminals onto the Existing Exhaust Tips, up to the joint point
(If desired, thanks to SS304 steel, it is possible to give a Welding Point)


Although mouting is simple and intuitive, FOR AN OPTIMAL MOUNTING, WE ALWAYS RECOMMEND THE INSTALLATION OF OUR ITEMS BY AN EXPERT.
As we will not take responsibility for the assembled and subsequently detached article.
We trust in your common sense.
€42.90 Regular Price €44.23
2 pcs EXHAUST TIPS for AUDI A4 B8 07-11 Chromed Stainless STEEL | PLUG & PLAY Installation
  • -3%
  • New
  • Out of Stock
2 pcs EXHAUST TIPS for AUDI A4 B8 07-11 Chromed Stainless...
COMPATIBILITY:

- For AUDI A4 B8 (2007-2011), With Left Double Exhaust

- "NO" For Versions That Have Standard Chrome Exhausts


ASSEMBLY:

1) Measure the Bumper Opening to Make sure the New Exhaust Tips comes out
2) Slide the New Terminals onto the Existing Exhaust Tips, up to the joint point
(If desired, thanks to SS304 steel, it is possible to give a Welding Point)


Although mouting is simple and intuitive, FOR AN OPTIMAL MOUNTING, WE ALWAYS RECOMMEND THE INSTALLATION OF OUR ITEMS BY AN EXPERT.
As we will not take responsibility for the assembled and subsequently detached article.
We trust in your common sense.
€42.89 Regular Price €44.22
Universal Car Roof BIKE RACK in Steel to be INSTALLED on Roof...
COMPATIBILITY:

- All Vehicles with Roof Bars


REQUIREMENTS:

- WHEEL WIDTH: from 25 mm to 35 mm
- BIKE FRAME DIAMETER: Ø from 28 mm to 40 mm
- ROOF BARS: Maximum 48 mm (Width) x 40 mm (Height)
- MAXIMUM LOAD WEIGHT: 15 Kg


INSTALLATION:

(Instructions Supplied)

- Secure the Frame Holder Pliers to each other, by means of the Special Spring + Bolt + Washer
- Attach the frame holder bracket to the front of the duct
- Screw the front part of the duct to the rear part
- Fix the Duct, complete with the Shelter Bracket, to the Car Roof Bars
- Secure the bike to the bike carrier by tightening the frame holder clamps and locking the wheels with the appropriate straps


Although simple and intuitive FOR AN OPTIMAL ASSEMBLY, WE ALWAYS RECOMMEND THE INSTALLATION OF OUR ITEMS BY AN EXPERT
As we will not take responsibility for the assembled and subsequently detached article.
We trust in your common sense.
€39.98
Car SEAT COVER Suitable for AUDI Seat | ANTI SWEAT in Black Breathable Fabric | Front Seat, Professional Use
  • -5%
  • New
  • Out of Stock
Car SEAT COVER Suitable for AUDI Seat | ANTI SWEAT in Black...
COMPATIBILITY:

- Universal | Cars, SUVs, Vans
- Reclining Seats
- Seats with Integrated AIRBAG


INSTALLATION:

- Remove the headrest, pulling it out completely
- Position the appropriate cover on the Seat, aligning it as best as possible
- Bring the central elastic behind the seat, inserting it on the backrest and making it go down to the height of the seat
- Insert the headrest again making it go through the holes in the seat cover
- Bring the rear elastic of the seat behind the seat, inserting it between the back and the seat
- Behind the seat, stretch the elastic just passed between the back and the seat and fix it under the seat with the hooks present on the front elastic of the seat
- Make sure the Cover is Aligned Correctly with the Seat
- Position the cover for the headrest and hook it vertically to the rear with the hook and the elastic on it.


(Although Simple and Intuitive, ASSEMBLY BY AN EXPERT IN THE SECTOR IS ALWAYS RECOMMENDED, TO AVOID POSSIBLE DAMAGE TO THINGS OR PEOPLE. WE ALWAYS RECOMMEND NOT DO IT YOURSELF)
€37.03 Regular Price €38.98
2 Wiper Blades for Audi A4 B8 07-11 Front HEYNER GERMANY FLAT...
COMPATIBILITY:

- For Audi A4 B8 (07-11), Front Windshield
- 9-11 adapters will be provided, including the one suitable for your car


FOR AN OPTIMAL MOUNTING, WE RECOMMEND:

- Although simple, we DO NOT RECOMMEND self-assembly unless in the presence of due assembly skills, as incorrect assembly of this product can cause damage to the windshield, the vehicle and the wiper blade itself.

- RAISE THE ENTIRE ARM: Raise the arm from the windscreen positioning it vertically, the methods for carrying out this operation are specified in the vehicle use and maintenance manual.

- DISCONNECT THE CLAMP: find the hooking clamp and detach the old piece that connects the blade to the Arm, replacing it with one of the adapters present in the newly purchased windscreen wiper blade.

- LOCKING: Install the wiper blade by closing it with the appropriate adapter supplied which you will have to compare in terms of shape and type of closure similar to the previous one already installed.

- CHECK: Place the wiper blades on the windscreen or rear window, checking their stability and positioning before using them.

- FIRST USE: Before using it, it is a good idea to carefully clean the windscreen or rear window with products suitable for removing the impurities accumulated on the glass, as these, although not very visible, could hinder the initial cleaning of the wiper blades, creating lines and at the same time prematurely wearing the new wiper blade.


We do not take responsibility for: erroneous purchases - violations of regulations or laws of any state - damages, which you may cause to you, to third parties or to the same article, as we describe each individual specification in detail.

We also remind you that, these are Aftermarket Items, designed for full compatibility and operation on the designated vehicle, but there remain products that may not be allowed for use on the public road.

We trust in your common sense.
€38.57 Regular Price €38.96
Adhesive Rear SPOILER FOR AUDI A4-A5-A6, for Trunk / Roof Lip...
COMPATIBILITY:

- AUDI A4, A5, A6

It is applicable on any vehicle: Cars, SUVs, Trucks. Perfect adaptability.


ASSEMBLY:

- Wash and thoroughly clean the surface where the spoiler is to be applied

- Remove the 3M adhesive film, and adhere the spoiler to the desired part

- Cut off excess parts

- Apply the two terminal parts in Thermal ABS supplied

(For a perfect fit, use a thermal body dryer)


FOR OPTIMAL MOUNTING, EVEN IF SIMPLE REPLACEMENT, WE ALWAYS RECOMMEND THE INSTALLATION OF AN EXPERT, as we do not assume responsibility for articles mounted and subsequently detached. We trust in your common sense.

€37.98 Regular Price €38.75
Rear SPOILER For AUDI A4-A5-A6 adhesive, for Trunk / Roof Lip...
COMPATIBILITY:

- AUDI A4, A5, A6

It is applicable on any vehicle: Cars, SUVs, Trucks. Perfect adaptability.


ASSEMBLY:

- Wash and thoroughly clean the surface where the spoiler is to be applied

- Remove the 3M adhesive film, and adhere the spoiler to the desired part

- Cut off excess parts

- Apply the two terminal parts in Thermal ABS supplied

(For a perfect fit, use a thermal body dryer)


FOR OPTIMAL MOUNTING, EVEN IF SIMPLE REPLACEMENT, WE ALWAYS RECOMMEND THE INSTALLATION OF AN EXPERT, as we do not assume responsibility for articles mounted and subsequently detached. We trust in your common sense.

€37.98 Regular Price €38.75
Adhesive SPOILER FOR AUDI A4, Bumper Lip or Side Skirt in...
COMPATIBILITY:

- AUDI A4

It is applicable on any vehicle: Cars, SUVs, Trucks. Perfect adaptability.


ASSEMBLY:

- Wash and thoroughly clean the surface where the spoiler is to be applied

- Remove the 3M adhesive film, and adhere the spoiler to the desired part

- Cut Posteriorly in large curvatures to facilitate folding

- Cut off excess parts

- Apply the supplied screws

(For a perfect fit, use a thermal body dryer)


FOR OPTIMAL MOUNTING, EVEN IF SIMPLE REPLACEMENT, WE ALWAYS RECOMMEND THE INSTALLATION OF AN EXPERT, as we do not assume responsibility for articles mounted and subsequently detached. We trust in your common sense.

€32.46 Regular Price €32.79
Adhesive SPOILER FOR AUDI A4 B8, Bumper Lip or Side Skirt in...
COMPATIBILITY:

- AUDI A4 B8 PRE-FACELIFT

It is applicable on any vehicle: Cars, SUVs, Trucks. Perfect adaptability.


ASSEMBLY:

- Wash and thoroughly clean the surface where the spoiler is to be applied

- Remove the 3M adhesive film, and adhere the spoiler to the desired part

- Cut Posteriorly in large curvatures to facilitate folding

- Cut off excess parts

- Apply the supplied screws

(For a perfect fit, use a thermal body dryer)


FOR OPTIMAL MOUNTING, EVEN IF SIMPLE REPLACEMENT, WE ALWAYS RECOMMEND THE INSTALLATION OF AN EXPERT, as we do not assume responsibility for articles mounted and subsequently detached. We trust in your common sense.

€32.46 Regular Price €32.79